| |
 |
Optical Measurements With non-contact measuring the measurements in 2D and/or 3D are performed without the risk of product deformation or damage. Within the (camera) field of view a very high accuracy can be achieved. The measuring speed of optical measurements with the DeMeet is very high. A 1
 Optical Measurements With non-contact measuring the measurements in 2D and/or 3D are performed without Optical Measurements With non-contact measuring the measurements in 2D and/or 3D are performed without
the risk of product deformation or damage. Within the (camera) field of view a very high accuracy can
be achieved. The measuring speed of optical measurements with the DeMeet is very high. A
|
| |
| Technical Specifications |
| General |
| Video System |
Video Model |
Combo Model |
| Touch Probe System |
--------- |
Renishaw TP20-5W (Standard) |
| Nikon Telecentric Lenses |
3.0x (1.0x, 5.0x and 10.0x optional) |
| Leica design Telecentric Lenses |
2.0x (1.0x, 5.0x and 10.0x optional) |
| Ringlight* |
White LED: 3 Rings, 16 Segments and 48 Cells (adjustable) |
| Backlight and Coaxial Light |
Adjustable |
| Reference Sphere (mm) |
--------- |
Ceramic ø 25 |
| Work table |
Anodized aluminum, tension relieved. Mounting hole pattern prepared for DF-System |
| Drive Equipment |
DC Servo Motors |
| Operation |
Motorized joystick control / Full CNC control |
| Construction DeMeet-220 |
Cast iron, extremely tension relieved |
| Construction |
Granite Surface Plate (DIN876/00) Portal: cast iron, extremely tension relieved |
| * For video models (not for DeMeet-220) a Ring light with 4 rings, 16 segments and 64 cells can be supplied as an option. |
| Measuring Specifications |
| Resolution (µm) |
0.5 (0.1 optional) |
Accuracy in µm for 0.5µm model (L in mm) |
U1(X,Y,Z) = 4+L/150* |
| U2(XY) = 5+L/150 |
U3(XYZ) = 5+L/150* |
Accuracy in µm for 0.1µm model
(L in mm) |
U1(X,Y,Z) = 3+L/200* |
| U2(XY) = 4+L/200 |
U3(XYZ) = 4+L/200* |
| Max. Velocity DeMeet-220 (mm/s) |
X, Y = 200, Z = 50 |
| Max. Velocity DeMeet (mm/s) |
X, Y = 250, Z = 50 |
| * The accuracy of the probing system should be taken into account. |
|
| |
 |
Optical Measurements
With non-contact measuring the measurements in 2D and/or 3D are performed without the risk of product deformation or damage. Within the (camera) field of view a very high accuracy can be achieved. The measuring speed of optical measurements with the |
|
| |
DeMeet is very high.
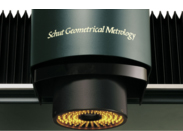
A combination of high quality optics and camera is integrated for a clear image with an excellent contrast and a high resolution. Telecentric optics are supplied as a standard to avoid perspective image distortion around the center of the field of view. The DeMeet is either equipped with Nikon or Leica-Design optics for a brilliant image with high contrast. The lenses generate a display magnification from 40x to 400x. Optimal illumination is essential for accurate measurements. The DeMeet is standard equipped with three different light sources. A ring light consisting of a 3 rings LED pattern, which can be controlled per individual ring, segment and cell, is standard supplied for optimal light configuration. The ring light can be set in intensity and angle to achieve the best contrast with clearly defined edges. The LED based backlight and coaxial light can be adjusted in intensity. The coaxial light can be used for illumination inside deep located structures. |
| |
 |
When measuring certain features encounters the physical limits of non-contact measurement, the DeMeet machines can be additionally equipped with a touch probe system With the DeMeet Combo model both principles are integrated and measurements can be performed by the optical and the probing system. Standard Renishaw TP20 with a 5-way stylus configuration is supplied.
Probing Measurements
In addition to the standard touch probe system, an optional stylus change rack (automatic probe configuration change) or indexing (probe orientation) probe systems can be utilized.
AfDM Multi-Sensor Software
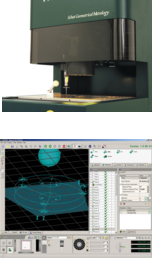
Approve for DeMeet is a true multi-sensor software package. It has been developed from the ground up, keeping the measurement inputs of the different measuring devices to just the necessary differences. Approve for DeMeet is designed to be a user-friendly software package, but still is flexible and very elaborate to measure many products. High accurate measurements in 2D and/or 3D can be done for all kinds of industries like precision mechanics, medical, plastics or electronics to improve quality control. All the measuring results of video and touch probe can be displayed, reported, exported and used in constructs together, and are dynamically updated. |
|
| |
Fixture Systems
Solid positioning of the measuring product is essential for accurate measurements, especially for touch probe measurements. A fixture system can also be used for batch measurements. The measuring table of the DeMeet is prepared for DF and Alufix fixture systems. DF-System is designed for constructing 2D/3D product fixtures, particularly for optical measurements. Produced from extruded or machined anodized aluminum DF consists of a full range of fixture components and is also available in basic sets. Alufix is a uniquely designed modular fixture system to prepare a product-fixture in a short time. Besides all the separate components two basic sets are composed for the DeMeet: an Alufix 16 set for light weight products and an Alufix 25 set for larger and heavier products.
Machine Construction
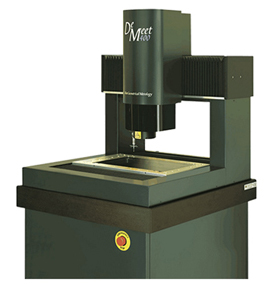
The DeMeet measuring machines are designed with a fixed bridge construction. The application of quality components ensures excellent performance and high accurate measurements. No cost and effort is saved to provide strong, reliable machines. The components are purchased from well-known, specialized manufacturers. The frame is a welded steel construction with support feet with rubber plates. Plate work is powder coated. The structure is made from a cast iron, extremely tension relieved portal of the bridge construction as the basis for the linear guides. For the DeMeet-220 the base is also made from cast iron. For the DeMeet-400 series and the DeMeet-705 the basis is a DIN 876/00 granite surface plate. The worktables are made from tension relieved anodized aluminum. The mounting hole pattern is compatible with the DF-system and the Alufix fixture system |
| |
Other Specification
| |
DeMeet-220 |
DeMeet-400 |
DeMeet-404 |
| Measuring range (mm) |
X = 220, Y = 150, Z = 100 |
X = 400, Y = 250, Z = 200 |
X = 400, Y = 400, Z = 200 |
| Table size (mm) |
X = 357, Y = 260 |
X = 560, Y = 422 |
X = 560, Y = 574 |
| Dimensions (mm) |
W = 455, L = 725, H = 615 |
W = 870, L = 930, H = 1570 |
W = 870, L = 1245, H = 1580 |
| Weight (approx. kg) |
110 |
510 |
710 |
| Maximum load (kg) |
20 |
50 |
50 |
|
| |
DeMeet-443 |
DeMeet-705 |
| Measuring range (mm) |
X = 400, Y = 400, Z = 300 |
X = 700, Y = 500, Z = 300 |
| Table size (mm) |
X = 560, Y = 574 |
X = 930, Y = 700 |
| Dimensions (mm) |
W = 870, L = 1245, H = 1800 |
W =1534, L = 1550, H = 1830 |
| Weight (approx. kg) |
730 |
1400 |
| Maximum load (kg) |
50 |
60 |
|
| |
| Power Supply (Stabilised) |
| Voltage (V) |
90 - 120 ; 210 - 240 (50 to 60 Hz) |
| Power (VA) |
400 |
| Environment |
| Operating Temperature (°C) |
15 to 35 |
| Storage Temperature (°C) |
-10 to 50 |
| Measuring Temperature (°C) |
20 ± 0.5 |
| Relative Humidity (%) |
40 to 70 (No Condensation) |
|
| |
| Computer Configuration |
| Minimum System requirements |
CPU: 2.0 GHz Core-2-Duo Intel (or AMD equivalent) or higher. Internal Memory: 2 GB RAM or more. Recommended Screen Resolution: 1920x1080 (Full-HD) Video: PCI-e display adapter supporting OpenGL with pixel buffer extension (recommended: nVidia Quadro NVS295 or higher). USB port to connect the dongle. Serial port to connect the DeMeet 3D CNC measuring machine. Only 'real' serial-ports are supported, USB-To-Serial converters are not supported. PCI-slot for SGM15400 frame grabber (video only). |
| Operating System |
Windows XP/Vista/7, For Windows 7 both the 32 bit and 64 bit version are supported, for previous versions of Windows only the 32 bit version is supported. |
|
| |
Specifications apply to all DeMeet models, unless otherwise specified.
Machines with higher specifications and/or modifications are available upon request.
Specifications are subject to change without prior notice. |
| |
| |
 |
| |
| |
|
| |
|

